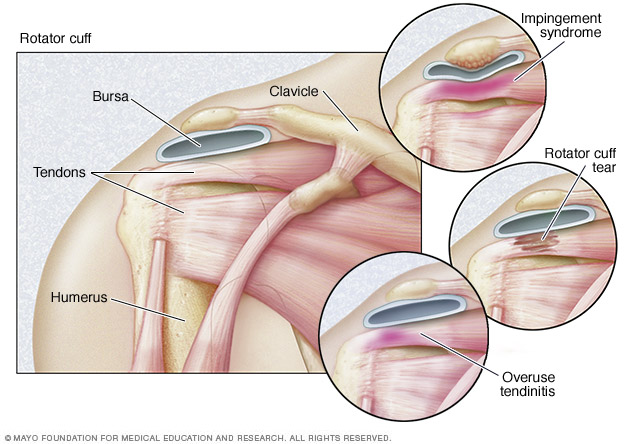
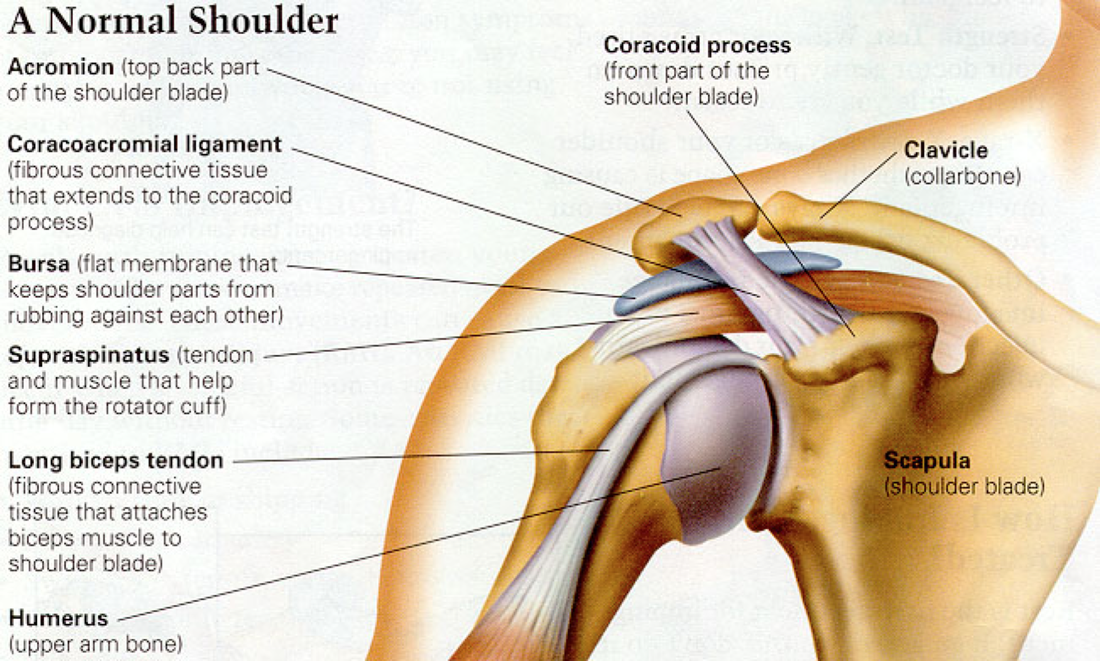
HUNTINGTON PHYSICAL THERAPY
  • Home
  • Therapists
  • Locations
    • Huntington Location
    • Barboursville Location
    • Kenova Location
    • Milton Location
  • Conditions & Injuries
    • Arms >
      • Shoulder
      • Elbow
      • Wrist & Hand
    • Legs >
      • Hip
      • Knee
      • Ankle & Foot
    • Spine >
      • Neck
      • Lower Back
    • Neurological
  • Services
    • Pelvic Health Services
    • Supplies
    • Dry Needling
    • Sports Medicine >
      • Return to Sports
      • Return to Sports Tools
    • Massage Therapy
    • Work Related Physical Therapy Services >
      • Ergonomic Work Evaluation
      • Functional Capacity Evaluation
      • Job Site Analysis
      • Pre-Placement
      • Stop Loss
      • W.O.R.C.
    • Splints, Braces, & Inserts >
      • Custom Hand Splinting
      • Custom Brace Fitting
  • Information
    • Patient Info
    • About >
      • Reviews
      • Vision
      • Successes
    • Videos >
      • Exercises To Do At Home
      • HPT Success Stories
      • Sports Rehabilitation Techniques
      • Educational Clips
    • Baby Boomers
    • Laser Therapy
    • FAQ's
  • Contact
  • Careers
  • Blog
  • Review Us | HPT
  • New Patient
  • Cookie Policy

Shoulder

Dedicated to Great Results

Shoulder Condition & Injuries


Rotator Cuff Tear

T​he rotator cuff is made up of four muscles: supraspinatus (on top), subscapularis (in front), and infraspinatus and teres minor (in back). All four of the muscles originate on the scapula (shoulder blade) and attach to the humerus (upper arm bone). The principle function of the rotator cuff is to stabilize and center the humerus in the shoulder socket while the bigger muscles of the shoulder such as the deltoids move the arm. As the name suggests, the rotator cuff plays a large role in internal and external rotation of the arm. When the rotator cuff gets damaged and this delicate muscular balance in the shoulder is disrupted, it can have major effects on the function of the arm.
Picture
Anatomy
Picture
What is a tear
​Tears of the rotator cuff can either be traumatic or degenerative in nature. Traumatic tears often result from falling on an outstretched arm or trying to lift something that is too heavy. We often find that traumatic tears do not respond as well to physical therapy without surgery as degenerative tears do. Degenerative rotator cuff tears can be caused by repetitive stress activity, poor blood supply, or bone spurs. Much of the recent research on the topic is discounting the role of the bone spur as a source of the tear in the tendon. The tear is typically located where the tendon attaches to the humerus or arm bone. If the tendon is just frayed and not torn all the way through, we refer to this as a partial thickness rotator cuff tear. These can still require surgery but much less often than a full thickness rotator cuff tear. A full thickness tear means that there is now a hole in the tendon where it previously attached to the humerus. Similar to a hole in a sweater, these tears can grow larger with time. Typically the tear starts in the supraspinatus tendon on top of the scapula and continues back into the infraspinatus tendon. As these tears get bigger and are present for longer they can become more difficult to repair.
What should I be doing to try and rehab my cuff tear and avoid surgery?
​Each patient with a rotator cuff tear can present in a different manner. There are some common limitations that must be addressed if one expects to avoid surgery. Tightness and loss of motion need to be addressed comfortably and not aggressively if a limitation exists. Posture is very important because the position of the spine affects the scapula and the position of the scapula directly affects the rotator cuff. Scapular strengthening is also important to give the shoulder joint a stable platform in which to move on. Rotator cuff strengthening is important but often it can be less important than the previously mentioned aspects of rehab. Most activity should be able to be done regularly at home and with minimal pain.
How do I decide if I need surgery or not?
​This is a very difficult question to answer because there are so many factors that go into the decision making process. This is the process we go through with our patients when trying to answer this question.
If it is effecting your sleeping to a great extent, the odds are you are going to have to have it fixed. Humans become very irritable and have difficulty functioning at a high level if they are not sleeping normally. This is often the biggest reason that patients opt for surgery. If you have tried rehab for up to six weeks and have not made progress, then you might have to think about a repair. Be mindful, all physical therapy is not the same. Overall function of the arm is an important criterion we use in determining need for surgery. When people are able to undertake all the activities they wish with minimal discomfort this is a good sign. Deciding to undergo a rotator cuff repair is not a decision that should be undertaken lightly. This surgery is very painful for several weeks afterwards. You likely will be in a sling for 6 weeks after the repair. Absolutely no sport activity for 4 months minimum and usually it is 6 months. Your ability to sleep after the surgery will be tremendously diminished for up to 4 weeks.
What should I expect after surgery?
​Depending on who the surgeon is will determine when you are referred to physical therapy. Some surgeons will send you right away after surgery and some will have you wait for up to 2 weeks. There is a protocol that is followed after a rotator cuff repair that is determined by the size of the tear that was fixed. The larger the tear, the more conservative the surgeon and physical therapist will be with your rehab.

Week 1-6: Most post-surgical protocols will have you in a sling for 6 weeks and will only allow the therapist or a family member to move the arm. At HPT, we will teach family members how to stretch their loved ones at home if we think it is necessary to regain motion in a timely fashion. That is up to your therapist. Though you cannot move the arm during the first six weeks, there are still some exercises for the spine and shoulder blade that can be undertaken to prepare the body for movement once the first six weeks have passed:

Week 6-12: We will start to introduce active assisted motion which means the opposite arm is helping to move the surgical arm. Along with these exercises, we will also have you work on contracting the rotator cuff in preparation for active motion of the arm without assistance. Everyone progresses at a different rate so it is impossible to be more specific. Once patients can fire the newly repaired rotator cuff muscle without pain, we will start trying to work on overhead motions and return to some light functional activities. It typically takes about 12 weeks to complete the post-surgical healing process with a rotator cuff repair. We are conservative during this period to ensure the patient gets a good strong repair and doesn’t damage the surgeons work.

Week 12-24: Around week 12 we will start actively strengthening the rotator cuff tendon that was repaired. As this strength progresses we will increase the demands being placed on the shoulder in order to return them to normal activity. Weight lifting and sports are definitely out of the question until 4 months post-op. At this point, the surgeon will assess the patient, place restrictions and give specific instruction as to what to avoid. Individual progress determines full release to normal activities. Start to finish the rotator cuff rehab after surgery takes every bit of 6 months. Due to the nature of the anatomy and the repair techniques currently being used it is very difficult to make this go any quicker.

Adhesive Capsulitis

ANATOMY
​The shoulder joint is considered a ball and socket joint, made up of the humeral head (ball) and glenoid fossa of the scapula (socket) which is surrounded by soft tissue (ligaments) that make up the joint capsule, which provides stability and decreases risk of dislocation.
Cause
​Adhesive capsulitis syndrome or “frozen shoulder” as it is more commonly known affects roughly 5% of the population annually. Approximately 70% of those affected are women; however men seem to suffer longer lasting symptoms with higher debility. Adhesive capsulitis is idiopathic, which means it does not have a known singular cause, but can be separated into primary and secondary capsulitis. Primary has sudden onset with no associated cause. Meanwhile secondary generally accompanies shoulder surgery, stroke, and has high prevalence in patients diagnosed with Type I and II diabetes.
Symptoms
​Symptoms, which include pain, range of motion loss, and lack of function can last between 1 to 24 months. Flexion, abduction, and external rotation are the three motions most limited. This decreases the patient’s ability to reach overhead, wash/comb their hair and even get dressed. There are three phases of this syndrome; the pain stage, the stiffness or “frozen” stage, and the recovery or “thawing” stage. During the stiffness phase of this syndrome the capsule begins to thicken and adhere to the humeral head limiting range of motion and increasing joint pain.
Diagnoses
​Adhesive capsulitis is relatively easy to diagnose as most follow the same capsular pattern (lack of flexion, abduction, and external rotation). This syndrome can be diagnosed with a few range of motion tests conducted by your local physician, orthopedic surgeon, or physical therapist.
Treatment
​The treatment of frozen shoulder will generally begin with physical therapy. This will include passive stretching in the clinic, joint mobilizations to decrease capsule tightness, and a home stretching program. As the patient’s range of motion begins to increase, they will move into more of a strength and function program to help them return to normal daily activity. During this period of time the patient may be prescribed NSAID’s (anti-inflammatories) or even have a steroid injected into the joint to decrease inflammation and help the healing process.
Surgical Treatment
​If the patient does not respond to physical therapy in a time frame that seems suitable to the patient, therapist, or physician they can undergo one of two surgical procedures. These surgical procedures include a capsular release or a manipulation under anesthesia.
The first and least aggressive of the two procedures to be performed would be a manipulation under anesthesia. The patient would be put under so the arm is completely relaxed. The next step would be to move the arm through flexion, making sure to hold down the scapula to ensure the patient is able to reach full range of motion. The arm is then moved through abduction, again holding the scapula in place to ensure full range of motion. Finally both internal and external rotations are moved through full range of motion, thus breaking free any scar tissue that may have formed. The main concerns with this type of procedure would be brachial plexus injuries and possible fractures, especially if the patient suffers from osteoporosis (brittle bones). It is possible for this procedure to be performed more than once, but it is more likely the physician would opt for a more aggressive approach such as a capsular release. Physical therapy is prescribed immediately after a manipulation to ensure scar tissue will not form.
​
The second and more aggressive approach would be an arthroscopic capsular release. After placing the patient under anesthesia the surgeon uses a surgical arthroscope to see inside of the shoulder joint. Arthroscopic tools are then utilized to cut away (release) any scar tissue that may have formed, along with the coracohumeral ligament on top of the shoulder, and a small portion of the anterior and inferior joint capsule. After the procedure, the patient is once again prescribed physical therapy for range of motion and to decrease risk of scar tissue formation. This time joint mobilization is not quite as aggressive since the joint capsule has been compromised and joint dislocation is an increased possibility.

Shoulder Separation

Anatomy
​ shoulder separation, also known as an acromioclavicular or AC joint separation, occurs where the top end of the scapula, the acromion, and the clavicle meet to form the socket of the shoulder joint.
The three ligaments that help support the shoulder joint are the superior acromioclavicular ligament, the trapezoid ligament and the conoid ligament. Tearing of these ligaments or avulsion of the lateral clavicle or conoid-trapezoid ligament origin may result in an AC separation.
Causes
​Falling directly on the shoulder with an outstretched hand or a sudden, traumatic blow to the shoulder are the most common causes of this injury. Shoulder separations are often seen in cycling, football, hockey, rugby, skating, and horseback riding.
Symptoms
There is usually pain, swelling, or bruising to the area. Shoulder separations are often graded by severity and displacement as follows:
- Type I: Sprain or injury to the ligaments that form the joint but no tearing or fracture.
- Type II: Complete tearing of the acromioclavicular ligament and partial tear of the coracoclavicular ligaments. There is often a noticeable bump on the shoulder, severe pain and loss of movement.
- Type III: Tearing of both the acromioclavicular and coracoclavicular ligaments, permanent bump on shoulder, and severe pain with motion.
- Type IV: Avulsion of the coracoclavicular ligament from the clavicle, pushing the distal clavicle behind the AC joint, into or through the trapezius muscle.
- Type V: Vertical displacement of the clavicle from the scapula, with tearing of the trapezial and deltoid fascia from the acromion and clavicle. There will be a visible shoulder droop on the affected side.
- Type VI: Rare and severe, traumatic injury with inferior dislocation of the distal clavicle below the coracoid. This injury, generally from a motor vehicle collision, may cause paresthesia and requires surgery in order to relocate the clavicle.
Diagnosis
​An Orthopaedic surgeon will conduct a physical examination for point tenderness and pain over the AC joint, anterolateral neck, or anterolateral deltoid region and order an x-ray when there is no visible deformity. In the event of a Type II or III separation, there is a visble and permanent bump on the shoulder. To check for clavicle instability, the piano key test can be conducted by pressing on the sternal aspect of the clavicle, forcing the acromial end down and releasing.
Non- Surgical Treatment
​Inflammation can be reduced through rest, ice, and anti-inflammatory medication. Physical therapy is recommended to decrease pain, increase range of motion and to help build up the rotator cuff and shoulder blade muscles in order to stabilize the joint. Most patients can return to sports and full function between six to twelve weeks.
Surgery
Type IV, V, and VI separations always require surgery. Surgery may also be recommended for throwing athletes and overhead laborers with Type III separations. Common surgeries include: Modified Weaver-Dunn or Rockwood screw. Physical therapy is always recommended after surgery in order to decrease pain and swelling and to regain range of motion and strength.

Call to Schedule Your Appointment Today
​304-525-4445

CALL NOW

Kenova
907 Oak St,
Kenova, WV 25530
304-697-9589
​

Picture

Barboursville
6007 Midland Trail #111, US-60, Barboursville, WV 25504
304-525-0794

Picture

Milton
1733 Midland Trail ste c, Milton, WV 25541​
304-525-4473
​

Picture

HUNTINGTON
2240 5th Ave, Huntington, WV 25703​
​​304-525-4445
​

Picture
Copyright 2017 HPT Services, Inc | Huntington, WV & Barboursville, WV | All Rights Reserved | Call Us Today 304.525.4445
Privacy Policy | Terms of Use | Cookie Policy

(304) 760-5957